Feeds:
Posts
Comments

Posts Tagged ‘frugal’

Free Items from coupons.

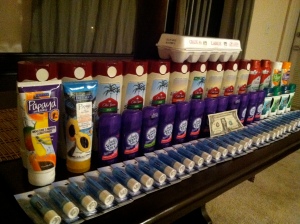
Free items "scored" from couponing.

Okay, I will admit it. For two weeks after watching the famous TLC show, I was an extreme couponer. Now it seems that everywhere I look, “coupons” are a topic of discussion. My friends begged me to “show them the way” so they could be part of the “revolution.” As with anything, I can only tell you of my experiences. Every grocery chain is different. Some offer double manufacturer coupons while some do not. (My particular store has a promotion where all coupons are worth $1.00. Keep in mind that although it helps, it isn’t a necessity to score free goodies).

The first thing you will need is coupons. Pick up your local Sunday paper and take a look through the inserts. Next, find out what your local grocer’s coupon policies are. Get flyers from the store or browse through the aisles. Look for items that cost less than your coupon value. Simple huh? Sure is. Now for the tricky part. I found that in my local store, I received a greater discount if I bought in quantities of four. So, in order for these items to be free, I needed to have at least four coupons on hand (1 per item) so I could receive the sale price. Get it? Good. So, the issue arises: How to obtain a large quantity of newspaper inserts without having to pay $2.00 per paper? Of course, none of the products are actually free if you are paying $20.00 for a stack of newspapers. For starters, I would advise checking with neighbors, co-workers, local businesses or online. My local Dollar Tree sells Sunday papers for $1.00 throughout the week. Personally, I found a woman online who was selling the inserts at a fraction of the price for each paper. I also made friends with a local business who allowed me to pick through the leftover papers at the end of the night. In total, I spent $8.00 on 45 inserts (3 inserts per Sunday paper). In addition to all the items pictured above, I also received sixteen free tubes of toothpaste and six chapsticks. As you can notice in the photo, the $1.00 bill and the eggs in the picture were also free. Some stores will offer cash back in excess of any coupon, and some stores don’t. Check your local grocer’s policy. As of today, Walmart’s coupon policy states that it offers cash back, so you may want to start there.

Coupon Organizer

Coupon Organizer

The first week was spent scouring the weekly ads and flipping through pages of inserts. Eventually, instead of cutting the coupons I made a quick Excel document listing the manufacturer, expiration date and insert name and date. I organized my inserts by name and date, and kept the printable coupons filed alphabetically by manufacturer. Everything was logged into Excel and then filed away. If you are serious about couponing, I highly recommend that you take the extra time to do this. Creating an Excel file will make it easy to do a quick search when you see items at the store that may correspond with a coupon. There are websites that will do this work for you, but each local store has different sales. If I had depended on the websites alone, I would of missed out on a slew of free items. Definitely check the websites weekly, because they will include printable coupons for free items as well. Here are a few links to coupon match-up sites:

http://www.livingrichwithcoupons.com
http://www.savingcentswithsense.net
http://thekrazycouponlady.com/

At the end of two weeks, I amassed over $200.00 in products. I created the perfect system and then, I just stopped. It wasn’t a conscious decision. I think it was my brain acting in self defense. I can see how easily this hobby can become a compulsion. Who doesn’t love free stuff? Watching your total rise and drop at check-out creates a rush of adrenalin. Walking out of the store with a cart-full of free products leaves you on an endorphin high. Neurotransmitters firing frantically, all over some free groceries. Would I do it again? Yes, but I could not make extreme couponing into a regular hobby. I watch the people on television, and I feel that they are slaves to their coupons. As a single woman, with no kids I feel that it takes more time than I am willing to allot. I will choose to get my endorphine highs at the gym or hiking a mountain, thank you very much. As someone who chooses home-made beauty products over synthetic chemical-laden ones; I have no need for many of the products advertised. However, I recommend that everyone try “extreme couponing” at least once. The best day for it, is on your birthday.

Birthday coupons are by far my favorites in the world of discounts and bargains. Last year, my birthday month consisted of one delicious free meal after another. If you haven’t already signed up for the email clubs of all your favorite restaurants, do it now!! Some of the highlights from my birthday couponing last year were: a free $30 gift card to Benihana’s, a free meal at BD’S Mongolian barbeque, a free entree at Brio Tuscan, free breakfast at IHOP, free ice cream at Baskin Robbins, free sub at Jersey Mike’s and a free cheeseburger at Ruby Tuesday’s. I had so many free meal coupons, I could not even use them all. Many of the coupons are valid for the entire month, leaving you with plenty of time to take advantage of the savings. Just be sure to tip properly (on the total amount before discount). To make it easier, I created an email address that I use specifically for discount clubs. Here are a few links I found from a quick search for free birthday coupons:

Birthday Freebies & Free Stuff from 300+ Companies in 2024 🎂 🎉


http://www.frugalliving.tv/free-stuff/birthday-freebies.html
http://www.joinemailclubs.com/

That’s my recap on the art of extreme couponing. Fellow couponers, feel free to share your stories, links or helpful tidpits. Novices, go ahead and spoil yourself; It’s free.
Read Full Post »

DIY Coasters

It’s mid-January as I write this. Seemingly recovered from the hangover of the holidays. Except, this year the consumption was not due to the excesses of whiskeys and sweet liqueurs, but instead of rubber cement and Modge Podge. At one point, my apartment seemed like Santa’s workshop gone awry. Piles of ribbons and bows, boxes, card stock and ceramic tiles. Yes, tiles.

DIY Decoupage Tile Coasters

I came across this lovely idea at: http://www.stylemepretty.com/2009/03/30/diy-coasters and I thought that in these days of “economical downturn” it would be the perfect gift for friends and family. Creative, useful and most of all inexpensive. At less than $1.00 per set, they make great gifts. Or, as the original link implies, wedding or party favors. As my boyfriend noted, coasters are one of those things that many people don’t buy for themselves, yet everyone can use.

It was an arduous process; At times I thought I was giving myself brain damage from the fumes of the glue as I tried desperately to adhere the cork board to the edges of the tile. Along the way, I learned that you can save yourself a ton of aggravation and time by using the self adhesive cork liner found in the cabinet section of your local home improvement store. The kicker was that it was my boyfriend (of course) who had accidentally found it. Three weeks into my “war on glue”, I was inhaling rubber cement and a host of other toxic adhesives, when he returned home with a sheet of cork-board, that while flimsier and thinner that the others, was completely self adhesive. Ahhh. . . the heavens open as angels sing joyous songs of celebration. It figures, my haphazard messiah shrugged off his seemingly miraculous solution to my vexing problem of adhesion in the world of Christmas crafting with a simple, “It’s all I could find”.

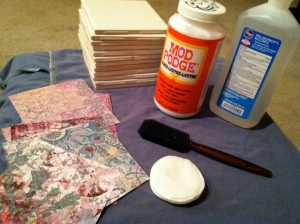
For this project, you will need:

1. Space. Depending on if your making four or forty; these little guys take a while to dry and require several layers of glue and varnish.

2. Time. Most of the work can be done from the comfort of the couch, while watching movies (or in my case, two seasons of Ancient Aliens). However, you must allow each layer to dry completely before starting the next. So, plan accordingly and do not stack the coasters until they are completely dry.

3. Ceramic tiles from your local home improvement store. I used 4″ by 4″ white tiles that cost $.10 a piece.

4. Decoupage Glue such as Modge Podge.
(If you are truly cash strapped, you can make your own decoupage glue with a mixture of flour and water, or water down white craft glue for the same effect http://www.ehow.com/way_5852511_diy-mod-podge-decoupage.html. You would however, need extra layers of varnish to ensure that they are waterproof)

5. Polyurethane or similar varnish

6. Exact-o-knife, scissors or razor
(I was fortunate to have a paper cutter, which makes for much easier execution)

7. Paper: Scrap Booking Paper, Card Stock, Colored Paper, Maps, Photographs, Love Letters, Magazine Cutouts; The list is endless. As long as it is made from paper, you can decoupage it.

8. Foam Brushes

9. Ruler

10. Sandpaper (optional)

11. Cork Board or Felt for bottom of coasters

12. Glue (if not using self adhesive cork)

DIY Decoupage Coaster Supplies

DIY Coaster Supplies

Step 1. Take a precise measurement of your tile and cut your paper to be .25″ smaller. If you have 4″ x 4″ tiles, cut your paper to 3.75″ x 3.75″. I like to work in stages, so I cut all my paper at once.

Optional step: If you like, you can sand and paint the edges of the tile. (I had a few bottles of toxic-free white out that I used to paint the edges of the black and white tiles to give better contrast. I chose to leave the colored tiles unpainted, for a more natural look).

Step 2. Clean the tile to remove any particles (the original post recommends using rubbing alcohol).

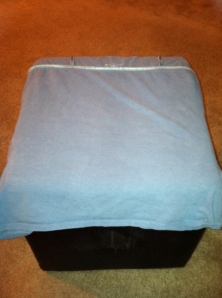
Step 3. Create a work surface (old t-shirt, towel etc.) Decoupage will stick to paper, as it is intended and can ruin your hard work if you are not careful. (I used an old t-shirt over an ottoman cover)

DIY COASTER WORK SURFACE EXAMPLE

Example of a work surface for DIY Coasters.

Step 4. Brush the tile with the decoupage glue, working in one direction. Try to get as close to the edges as possible.

Step 5. Using your fingers, start in the middle of the tile and the smooth the paper outward towards the edges (this should remove any air bubbles that may be trapped underneath).

Let dry approximately fifteen minutes

Step 6. Brush a second layer of decoupage across the tile. Keep in mind that the brush-strokes will be slightly visible when dry, so try to keep your lines as straight as possible. You can paint each layer in the same direction, or alternate directions creating a hatch-mark effect.

Let dry approximately fifteen minutes

Repeat this process until the paper is fully adhered. (I used two – three coats, depending on the thickness of the paper)

Step 7. Apply varnish. It is very important to make sure that you let each layer completely dry or will you will end up with air bubbles in your finished product.

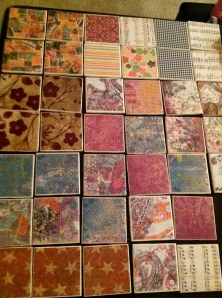
DECOUPAGE TILE COASTERS

DIY TILE COASTERS

Step 8. Attach the liner to the bottom of your tile. If you are fortunate enough to have found the cork shelf liner, just cut and peel. If you are using glue to adhere the cork or felt, I had the most success with rubber cement or heavy duty craft glue. Be sure to use these in well ventilated areas.

There are infinite ways to decorate your coasters. You can use stamps, stencils, ribbons, or paint. Sparkles and seashells, leather, satin or lace. The inspiration post shows beautiful, professional looking wrappings. As my coasters were not favors for an elegant affair but rather a small token of appreciation for the many special friends in my life; I chose ribbon. All in all, besides the “war against glue” and the space issues that arose from the project, they were a huge success. Happy crafting!!

And for all of you non-crafters, my handcrafted items are also available for purchase at www.warpeddna.com.

DIY Decoupage Tile Coasters

Decoupage Tile Coasters

Read Full Post »